Removable Wallpaper for a Fraction of the Cost

I love wallpaper. I LOOOVE wallpaper. When I was a kid, my mom redid our kitchen and added pineapple wallpaper (plus pineapple metal inserts in the cabinet doors AND a pineapple stained glass window), and I remember thinking it was the absolute coolest room ever! However, I change my mind a lot so I prefer easily removable wallpaper that doesn’t require a lot of wall repair when it’s removed. I’ve used peel and stick wallpaper many times in my last two homes.

My DC Home’s Parrot Half Bathroom

The issue with peel and stick wallpaper is that it can be expensive, and a higher cost doesn’t necessarily mean a better quality. In fact, most of the brands that I’ve used have been made with the same stretchable vinyl that can be a bit finicky compared to traditional wallpaper.

After trying many brands from a variety of price points, I’ve discovered that my preference is the absolute cheapest. The more expensive paper often has a better selection of stylish prints and hopefully a higher quality print; however, my experience has been that the ease of application was actually best with this very inexpensive Amazon paper that I used in my pantry and master closet of our Florida home.

I pulled together a list of some of my favorite discount wallpapers from Amazon. For comparison, my parrot wallpaper was $15 per foot (WallsNeedLove), and my dotted wallpaper was $2 per foot (Target). These papers seem to have similar quality (although print quality definitely varies). I recommend sorting your Amazon search by price low to high and by prime to see what the most recent deals are. I’ve found that these sell out fast, but new ones also frequently arrive. Every few days there are new, inexpensive deals on wallpaper!

This paper is only $0.49/foot!!!

This next paper is definitely specific to my style because I am obsessed with burlwood. I normally wouldn’t love a faux wood paper, but I can picture this in very specific design plans.

This paper is $0.90/ foot.

You can never go wrong with a grasscloth look! It always looks refined and upscale.

This paper is only $0.60/ foot!

Finally, I’m actually considering purchasing this one. I love it for an inexpensive bathroom update idea! I have a lot of taupe tile that I can’t change out for a while. I could picture this making it feel more modern and fun!

Did I mention that this is $1/ foot?

Out of pure laziness, I prefer wallpapers that do not require me to tediously match up the print (and waste several feet of paper) so my preference is always for more organic forms, busy geometric prints, or faux grasscloth since most of those don’t require too much effort in placement. I’m currently on the hunt for a paper to for my girls’ bedrooms, as well as the upstairs bathroom. I search Amazon every couple days to see what new items come out so this compilation might be outdated very, very soon!

Wallpaper Tip: It is important to always order more wallpaper than you think you need. Wallpaper always has to be ordered from the same batch number since there is color variation in each batch. If you are a roll short and you have to order later, it might end up coming from a different batch number and will not match up perfectly.

ewe

Thrifting Your Way to a Beautiful Home

Before I share HOW I source secondhand finds for our home, I want to share WHY I choose to use them as much as possible.  The obvious first reason is budget.  Everyone has their own priorities for spending, and our family prioritizes doing activities over buying things.  Decorating my home on a budget with secondhand items allows us to use any money saved for travel and other family activities.  Second, fast fashion and home decor products are major contributors to landfills.  Choosing to use pre-loved items in my home keeps those items from ending up in landfills and is the most ethical choice for decorating.  Finally, I love having a unique, collected home that doesn’t look like it came directly from a big box store.


I’ve actually written a bit about this in the past when I used to guest blog for Goodwill Stores of Greater Washington, but I thought I would expand on it a bit since I don’t go to thrift stores frequently anymore.  Also, we just purchased a new home that is larger than any home we’ve lived in before so we have a lot to furnish, and I find myself relying on these tips more than ever.

20190226_194045

Thrifted Items: Console Table, X Benches, Chesterfield Sofa, Side Table

  1. SHOP YOUR HOME:  Not loving your current decor?  The absolute cheapest way to redecorate or to even know what you actually need to buy is to shop your own home.  Rearrange your current belongings and try rugs, paintings, furniture, etc in different rooms and in new combinations to create new looks.  I never sell off unwanted furniture until I know for sure that it won’t work for me.  Similarly, I never buy “new” furniture or decor for a home without living in it for a while first.  I arrange and rearrange until I know for sure what will work best in the new space.

    before

    Thrifted Items: EVERYTHING (but the plant)… and most of it has a new life in my new home.

  2. GO SLOW: Don’t rush to fill a space.  I have 3 outdoor spaces and 4 indoor spaces that need furnishings, and they’ll stay empty until I find the right pieces.  I don’t like to waste money and effort with buying placeholders for a room.  I only buy items that I absolutely love.  When designing a room for other people, I usually keep to a theme (either color or just a general vibe) and try to only look for pieces within that theme.  However, when I am shopping for myself, I only buy things I LOVE.  I love having an eclectic home, so I don’t mind if my furnishings don’t match perfectly.  They somehow all work together, and a big reason is because I purchase only things that I love.

    20181102_074156

    We lived without nightstands for quite a while before finding (and painting) these that were the right height.

  3. MAKE MISTAKES:  Don’t be afraid to purchase items and try them in your home.  I went through 6 sofas (all pre-loved) before we found the one we currently have and love.  Funnily enough, 4 of those were leather Chesterfields because I like what I like and buy what I love (HA!).  The best part about buying used items is that you aren’t investing too much and can usually resell them for the same amount that you bought them for… sometimes even more.  So if you think those gorgeous velvet chairs on Craigslist will look great in your home, get them!  And if they aren’t perfect, sell them.  No big deal!

    img_4531

    A few of our earlier Chesterfield sofas

  4. KEEP A LIST:  I have a long list of things I need for our new home.  When I’m going through a thrift store, I’ll take a glance at the list (on my phone) while I’m in the store and just do a quick pass through to see if any of the items are on the list.  Today, I scored a heavy wooden toddler step stool to use at the sink for only $5.  That’s been on my list since I’ve had my firstborn, but it didn’t seem like a necessity that deemed a $40 new price tag.IMG_7926
  5. FILTERS AND KEY WORDS:  I filter my finds on FB Marketplace and Craigslist in very specific ways.  For Craigslist, I always filter by the category I want (usually furniture or antiques) and by “owner” then I scroll through with the gallery view.  It allows me to very quickly look through posts.

Screen Shot 2020-08-21 at 8.57.55 PM

On Facebook marketplace, I usually do not search by category, but I do filter it by “local pickup” and sort it with listings nearest to my home since I don’t like to drive far distances for my finds (that’s just a personal preference).  I often also sort it by newest or filter it with only finds from the last 24 hours.

Screen Shot 2020-08-21 at 9.19.17 PM

Keywords are extremely helpful in finding pieces that you love.  I’ve found that brand names (like “Pottery Barn”) aren’t particularly helpful in finding items, but descriptive terms are.  For example, I often search for “lucite,” “bentwood,” “velvet,” and “chinoiserie” to find items that fit my design style.  I personally stay away from terms like “boho” or “midcentury” because they are often used to market an item and price it higher than it is usually worth.  I’ve had better luck using broad terms like “old” or “vintage” when searching for midcentury items for a very low price.  I also keep alarms set for certain key words.  For example, I currently need 3-4 bar stools for my kitchen.  I have an alarm set for the term “3 bar stools” and get notifications every time someone makes a post that contains some combination of those words.


IMG_3524

I hope this was helpful!  Happy thrifting and saving!

March 11th

March 11, 2011: I was a teacher in Iwakuni, Japan (a city in central Japan) when the news of the massive tsunami in the north came in.  I had JUST been up north.  My husband was out of the country and was scheduled to fly into Tokyo in the coming days.  Then, I saw the horrendous videos and the devastating aftermath and was forever changed.  It’s a day that I remember yearly.  I remember those lost, but I also remember the resilience of the Japanese people (and of people everywhere that came together to send supplies and assistance).

japan

March 11, 2020:  I had just messaged a former colleague from my time in Japan.  We discussed the tsunami of 2011, as well as the looming virus that was spreading across the world, when I saw the news that life was about to slow down considerably for me.  I was living in downtown Naples, Italy with my husband and our 3 month old and toddler on the day that the lockdown orders were issued.  There was no warning so I didn’t have time to prepare supplies, including clothing or diapers for my infant, toys and activities for my toddler, or groceries from a large supermarket.  My pregnancy had been very difficult and had affected my mobility, and I had given birth during flu season so I had been staying home for many months.  We were just finally starting to leave our home and entertain traveling as a family of 4.

20200301_114601 (1)

I suppose I should have expected a lockdown in hindsight since I had been following news of the virus.  The weekend before March 11th I had met with a close friend and discussed flying back to the United States in case the virus moved south.  You see, the health system in the north was overwhelmed by the virus, and the north has a world class health system.  The same cannot be said for the much poorer south, where we lived.  We discussed if our children could get the care they needed if the virus came to us, and we both agreed that no- possibly not.  With all of the unknowns of this virus, we were scared- rightfully so.  My friend flew home with her toddler, but I stayed in Naples with my husband.  We hadn’t announced it yet, but our home was already packed up in boxes and we were expecting to move back to the United States any day.  My difficult pregnancy had caused some health issues, and my husband took a job in Florida so I could receive treatment that wasn’t available to me in Naples.

20200226_091901

Of course, waking up on March 11th, everything changed.  The lockdown in Italy was one of the strictest in the world.  Our region’s president issued rules that were stricter than other areas of Italy for good reason.  Campania (where Naples is located) is a very poor region of Italy.  We were unable to leave our home, unless our job was considered essential (which my husband’s was).  We had to carry paperwork explaining why we were outside of our homes, and if we were caught outside of our homes without the paperwork or for unnecessary reasons we could be fined or jailed.  Walks, exercising, hiking in the great outdoors?  All forbidden.  A car ride to get some fresh air?  Forbidden.  We were stuck in our small city apartment with only our little balcony for some fresh air (and even then, I had neighbors yell at me to bring my kids inside because they could get sick being on our balcony).

Screen Shot 2020-07-15 at 4.23.37 PM

The most challenging issue for me was getting groceries.  Italian food has less additives than American food so it has a relatively short shelf life.  Yogurt was only ever good for a few days after I bought it.  I couldn’t shop for several weeks at a time in one trip.  Additionally, I lived in the city and only had access to city markets.  All of the large supermarkets were outside of my municipality; therefore, I could not travel to them.  In normal times, I would have to go to 3-4 different city groceries to complete my shopping list or do one big visit to a supermarket in the suburbs.  Now, with the lockdown, I was stuck waiting outside of these stores for 20-40 minutes… and I could only do it after my husband got home from work because children were not allowed out at all.  How did single moms do it?  I have no idea.  Additionally, I had a new baby and baby items are not widely available at grocery stores so I had to also go to the local pharmacy (and wait in line) to get those essentials.  Delivery was available from stores and Amazon for the first couple days, but it was stopped soon after for non-essential items.  I was lucky to get a couple toys for Esme before they stopped it.  Many kids were on lockdown without the ability to get crayons, markers, indoor exercise activities, etc.

20200330_100715

I’m ashamed to complain about all of this because my husband was still working, and we still had money to purchase necessities.  In the early days of the lockdown, there were many that were rummaging through the trash on my street.  I set a bucket with some pre-packaged food, water, and Euros by my balcony window so I could throw it down to anyone in need.  However, that was minimally helpful since those people were also being fined and arrested by police for breaking the quarantine so they stopped coming out.  A few weeks later though, I noticed that car alarms and house alarms were going off more frequently.  That started to concern me because hunger creates desperation, and boredom creates opportunity.  When my husband told me that we had a small window to leave, I repacked our things quickly (everything had been in boxes since January, then I unpacked a lot so we could use it during the lockdown) and had to text our goodbyes to friends rather than hug them in person like I wish we could have.  It seems dramatic, but Naples is known for being a poor city with high crime during normal times.  Being home alone all day with two young children made me feel a little anxious about the unknown and how things would progress.

20200314_131548

It wasn’t all bad, of course.  The unity in the city was amazing.  The world watched on the news as we had evening concerts on our balconies.  Dance parties every evening.  We looked out our windows everyday at noon to clap collaboratively for health workers.  We yelled to neighbors across the street to have conversations and to feel connected.  There was beauty.

20200316_071018

We moved to a hotel room on the U.S. military base without any real plan of when and how we would leave Italy.  We knew we could be there for a few days or weeks, and we were hopeful it wouldn’t drag on for months.  One day before a flight out of Rome, we were approved to hop aboard it and return to the U.S.  There were strict rules involved, including wearing masks for the duration of the flight and the entire time we were in airports, as well as a strict two week quarantine period once we arrived.  We also could not have friends drive us to the airport in Rome since people could not leave their municipality, so we hired a taxi to drive us the two hours there at 0330 in the morning.  It was quite an “adventure,” especially with a cat traveling with us.

20200329_200759

I’m leaving out a lot of details, like how we sold our Italian car, checked out of our apartment, managed the movers, and got a pet passport for our cat (which included a lot of drama, money, and favors).  I’m also leaving out more tragic details, like how our nanny was diagnosed with COVID and ended up in the Italian hospital (and is thankfully recovered now).  How one of our cats got gravely sick, but we couldn’t find an emergency vet that would see us and by the time someone would, it was too late.  How I pushed him in a stroller through the city to knock on random vet doors hoping for someone to see him.  How he passed away and we had to explain death to our toddler.  How we explained germs, masks, hand washing.  How we explained that she couldn’t hug her nanny goodbye or see her schoolmates again.  How we explained the flight and the new procedures in airports.  How we discovered that our infant was on America’s “No Fly” List because she was born in Italy.  How the embassy had to intervene so we could return to our home country.

20200408_101546

The flight to the United States was actually quite wonderful.  There were only 7 other people on our large airplane, which meant we had an entire SECTION to ourselves, as well as our own bathroom.  Our cat even got to ride up with us, instead of in the cargo area like he normally does.  Everything was well-sanitized, and everyone wore masks for the duration of the flight.  We packed our own food and snacks, just in case, and brought a pop-up tent so our toddler could lounge, roll around, and play in the airports without actually touching anything.  The following flights within the United States were still sanitary, but masks were obviously not mandatory on these much busier flights.

20200408_161012

We arrived to our new “home” in Florida at 3 in the morning, and I was shocked that both girls immediately went to sleep and seemed to adjust to the time change with ease.  I still cry thinking about the first day in the United States.  Our oldest had been stuck in a tiny hotel room or apartment for a month, but really she hadn’t gotten out much for many months due to us having a newborn.  She was OBSESSED with running around in the backyard and eating all of the American food that was awaiting us.  There was a very strong sense of relief that it was all over combined with sadness to leave a country that we loved in such a sudden way.

March 11th has forever changed our family.  Although it’s very cliché, March 11th, 2011 taught us to appreciate each moment, causing us to put our family-building plans on hold and to pack as much adventure into our 20’s as we could.  March 11th, 2020 changed the way we live our daily lives completely.  By that I mean, I started this blog as a city dwelling, minimalist with a passion for thrifting.  However, after 16 years of living in walkable urban areas, we are moving to a home in the suburbs (something we swore we’d never do).  I’m not sure why, but I’m mourning this move a bit, despite the fact that I truly believe it is best for our children.  There’s nothing inferior to raising a family in an urban setting, but my mental health was not well living in a confined space with 2 young children that needed me constantly.  In fact, the outdoor space in our new home is one of the first spaces we are tackling as a DIY because we NEED that space to function for us.  We hope it will be a place of healing, memory making, and a refuge from the craziness of this pandemic.

Breakfast Nook Planning: DIY Banquette Ideas

Our kitchen has been the most used and least decorated room in our Italian home.  We eat out twice per week, which means I cook and eat 19 meals every week in our kitchen… SO much time.  It’s a large room with a breakfast nook space, but the entire eating area was taken over by an oversized American refrigerator for a long time, forcing us to utilize a tiny wall as our main eating area for the past year.  Would you believe those barstools were these ones from IKEA that I decoupaged with fabric to make them look upholstered?!

20190205_072111.jpg

DIY faux upholstery and faux wallpaper

After months of trying to make this set up work, we finally decided to get rid of the giant refrigerator since it was barely used (we have a built in European refrigerator in our cabinetry), as well as the “island” and bar stools.  We needed a space that was more functional for our growing family.  Here’s the space currently with our small hallways bench and the same “island” but lowered to standard height.

20190909_154915

The Breakfast Nook Space: Planning Attempt

I’ve always wanted a little breakfast nook.  In fact, I wrote a full post planning out my dream breakfast nook when we lived in our little DC apartment!  Here is one of my design ideas from that post, although I can’t utilize most of the sources over here in Italy.  I know for sure we want a banquette like the image below (but wipeable, toddler-friendly fabric), a round table, and two sturdy side chairs.  Screen Shot 2018-01-06 at 7.08.57 PM

I visited dozens of Italian furniture and thrift shops in search of a banquette or settee with no luck.  I decided to broaden my search to benches and still came up short, especially since I needed it to be roughly the same length as our kitchen nook wall (78 inches).  I finally decided to peruse IKEA for some DIY ideas and came upon two that might work for our space, a more expensive option and a more labor intensive option.

  1. IKEA Industriell Bench ($229): This basic wooden bench lends itself well to an IKEA hack.  The seat and back could easily be upholstered, although I love the idea of making a leather cushion for the seat and back and using leather straps to adhere it to the raw wood, similar to this leather headboard by The Citizenry.    This idea could be relatively easy, just a matter of sewing a couple cushions and straps.  I love this bourbon and camel faux leather, and the prices are SO good for a wipeable, kid-friendly fabric!

    Screen Shot 2019-09-10 at 2.02.01 PM

    Mock Up of Industriell Hack

  2. IKEA STUVA bench ($39 each, I’d need two): This idea is not fully flushed out because I have about 4 different ideas of what to do with these benches.  I would put two side by side and build a long upholstered seat over them (like above but not strapped on).  IKEA has a pull out storage drawer that can be purchased separately for them, as well, that I’m considering.

    Screen Shot 2019-09-10 at 9.02.06 PM.png

    STUVA benches

    One possibility is adding an upholstered wall behind it, possibly with a channel tufted look.  Pretend like this REALLY bad photoshop is a gorgeous upholstered wall and bench combo that looks like a built-in banquette. I’ve seen a few DIY versions of this channel tufting, but I’m convinced it could be done with clearanced pool noodles that are individually wrapped in fabric and braced together before being attached to the wall.  I’m very tempted by this possibility just to test that idea.

    Screen Shot 2019-09-10 at 3.01.21 PM.png

    TERRIBLE Photoshop Attempt at the STUVA benches turned into a tufted banquette

    I can also picture a much simpler upholstered cushion with a long back pillow that matches and some simple art hung above it.  Here’s some really bad photoshop to give that mental image.

    Screen Shot 2019-09-10 at 9.13.51 PM.png

    STUVA benches with upholstery

    I’m leaning towards the STUVA benches since we won’t be at this home forever and they would be GREAT toy storage in any future home (plus they’re cheap).  I also I like the idea of a little extra challenge to make them look expensive in our home.  I would absolutely DIY the INDUSTRIELL if I knew I’d have the space for such a massive, heavy bench in any future homes.  I’m excited to get started on this project though, and my family is excited to have a proper sitting area for meals.


Balcony Reveal

I realized I never put up a reveal post of my little Italian balcony, and I thought I’d share it.  This balcony was never used before, as our city gets a lot of dust and dirt.  It was hard to keep it clean, had way too many planters (that came with the apartment and had to stay here), and wasn’t an enjoyable area to hang out.

This slideshow requires JavaScript.

I started by cleaning it REALLY well.  Muriatic acid is wonderful for cleaning stucco, but follow the instructions on the bottle as it is a dangerous acid.  I had to clean everything during a few nap times so it took quite a while.  I purchased the RUNNEN outdoor tiles from IKEA in both dark grey and faux grass.  I had originally wanted the wooden tiles, but I knew they would crack and fade in time from reviews.  I’m really glad I ended up choosing the plastic decking, as it has held up beautifully and doesn’t splinter at all!

20190301_145617.jpg

Installing the RUNNEN tiles

Installation is a BREEZE!  I installed the entire patio in one nap time all on my own (well, with the assistance of a rubber mallet).  The faux grass tiles are a bit trickier to snap together than the plastic ones, but nothing I couldn’t handle on my own.  I also was able to break the tiles in half for the back portion that could only fit half of a tile.  No saw needed!!!

20190305_105301.jpg

Step 2 Complete!  Tiles installed!

Once the tiles were installed, all of the “fun stuff” was added: a little clearance chair for Esme, a café set for Mark and I, the MANY planters, etc.  I had to stack a few of the planters so they didn’t take up too much space, and I really like the visual height it provided in the space.  I don’t have a green thumb, so I started with just one live plant (a kumquat tree), added in a couple flowering plants, and will add a few more this Spring.  I also added faux plants because we won’t live here long enough to train real ivy along the trellis, and I wanted a little green touch.

20190412_154313.jpg

Esme LOVES picking the kumquats

We use this space SO much now.  Esme loves going outside to look at airplanes and cars, and most of her toys have made an appearance out here.  You can see the hanging plants on the trellis here, all fake, as well as our solar lights that give it such a romantic glow in the evenings!

20190408_145539.jpg

Esme enjoying a unicorn ride on the new balcony

Do you see that single grey tile above?  I was short just ONE half tile of faux grass so I had to use tile there.  Luckily it’s actually where we keep a water collection jug for the condensation from our AC unit.  To clean the tiles, I simply pour that water all over the tiles and DONE.  That’s it.  Reuses water and cleans the tile of any city air pollution all at the same time.

We came out here every single day in the summer to enjoy our little balcony pool or eat popsicles.

20190424_150036.jpg

Balcony Pool Time!

As for budget, this wasn’t our cheapest DIY to date.  I wish I had been a bit more patient and tried to purchase the floor tiles (the biggest investment) second hand.  About 3 weeks after I had installed them, I saw some for sale on my Facebook marketplace.  Everything else was purchased fairly inexpensively.  Including all of the furniture, plants, floor tiles, lighting, etc, we spent less than $300 on this update.  That is definitely not chump change, but it gave us a little “yard” and a taste of nature in our downtown city home.  For the amount that we’ve used it over the past several months, I’d say it was money well spent.   Also, the little view it gives us from our bedroom when we first wake up is an added bonus!

20190313_143745

View out our bedroom window

Hope you enjoyed seeing our little update as much as we’ve enjoyed using it!

Maximizing a Small City Balcony

In our DC home, one of the first spaces that we updated was the patio… and it was friggin’ GLORIOUS.  When you live in a city, having your own outdoor oasis feels incredibly luxurious.  We built seating and hung outdoor lights, and we threw some fabulous parties there.

IMG_0156

Our Washington D.C. Outdoor Patio

Flash forward to our Italian home, and our tiny balcony is T.E.R.R.I.B.L.E.  Yes… it’s so bad that I needed to capitalize it AND add unnecessary periods for emphasis.  It’s dirty.  It has a lot of empty planters that were left here, half full of old soil, cigarette butts, and ashes.  It has never seen a power washer, and I guarantee it has been decades since it’s been used.  BUT it has a lot of potential.

20190225_090830-1

Italy Balcony (BEFORE)

WHY are there 11 planters in this tiny space?! I can’t even keep one plant alive, let alone however many plants it takes to fill 11 planters.    I spent an entire toddler nap time one day researching how to care for plants in the Mediterranean climate, and I discovered that I legit know nothing about plant care. And the stucco walls… does the camera properly show that you cannot even brush up against them without turning grey?

20190225_090822

Our Italian Balcony (BEFORE)

We chose our city apartment for its location.  We can walk to 10 groceries stores (and counting), 2 parks, a ton of shops (Zara included), several gyms including Mark’s Crossfit box, and numerous activities.  We don’t have a great view from our place though so we had to create a plan to make our small outdoor space into an area that our family wants to congregate.

OUR NAPLES, ITALY BALCONY PLAN

  1. CLEAN, CLEAN, CLEAN: I came out here the other day with an acid brush and a bucket of water and scrubbed the stucco walls.  They still don’t look new, but they do look a lot better than before!  Also, minimizing the amount of “stuff” that is on the balcony makes it feel cleaner.  I got rid of a few planters, put the two outdoor rugs into storage, and generally tidied up the area.
  2. PLANTS: Bringing a bit of nature to your city home can make a huge difference.  I found the photo below and loved how that tiny city balcony almost feels like a yard.  The privacy trellis and built-in planters are stunning, especially combined with the artificial turf and decking.  Since we live in Southern Italy, I’d love to plant a citrus tree and a few herbs to use in our kitchen.

Screen Shot 2019-02-27 at 12.47.23 PM

*In order to recreate this look, I found IKEA’s RUNNEN fake grass.  It clicks together easily and would be about $230 for the amount I need.  IKEA also carries fake decking, if I wanted to recreate the mixed decking and grass look above.  I also found this faux turf on Amazon that would be about $125.  We have a local hardware store called Leroy Merlin that also carries fake grass that is the EXACT size I need, but it requires glue to adhere to the ground and is $165.

3. PRIVACY: We live in a major city so privacy is never truly obtainable, but we can provide the feeling of intimacy and coziness.  We have a large iron trellis on each end of the balcony that is perfect for a plant privacy screen.  I love the one below that was created by zip-tying faux plants to a screen.  If you are a gifted gardener, you could also train a vining plant to do the same (but with less coverage of course).

4. LIGHTING: We already have 2 outdoor lights on our balcony that provide ample light for reading, eating, or frolicking about in the evening.  In our last home, we loved our overhead party lights, but they aren’t a feasible option in our current home due to the concrete balcony that is 12 feet above us.  We also considered roping similar lights to the front of the balcony, but the location of the outdoor plug (dead middle of the balcony against the building wall) would make plugging them in a bit of a feat.  THEN, I found these solar lights and got a stellar idea that I’m hoping will work!  Since I just want a bit of ambiance lighting, I thought I could use the solar lights and string them UNDERNEATH the IKEA RUNNEN decking so that the light will shine through the flooring cracks.  Hoping that works!

5. SEATING/ DECOR:  We already own this inexpensive IKEA patio set, and it’s perfect for our needs.  On a recent trip to IKEA, our daughter fell in love this outdoor kid’s chair that was in the “AS IS” section on sale so in an effort to keep the balcony uncluttered, that is all that we are putting on it.  Plants, flooring, and lighting all are decorations, but I do plan to DIY an all-weather wall hanging to place between our outdoor lights.  Recently, our dryer belt broke so I plan on using it as part of my DIY art. 🙂

I’m excited to get started and to share our finished space with you!!

Marrakech with Kids

I’m not a travel blogger whatsoever, but I absolutely appreciate and rely on travel bloggers when I am planning trips.  My husband and I have backpacked together (pre-baby) across 4 continents, but we’ve never made it to Africa and were ecstatic to book our first trip to North Africa… to Marrakech, Morocco to be exact.  I have always been enamored with Morocco, at least with what I knew of it: beautiful decor and architecture and delicious food.  We spent just under one week in Marrakech, and here are just a few highlights of our short trip with our one year old daughter.

  1. Lodging:  All types of lodging is available in Marrakech in many different neighborhoods, and the prices reflect that.  The average hotel price is $50 per night, although luxury accommodations can be much, much more expensive.  We chose to rent a Riad (old traditional house around a central courtyard) through AirBnB in the Medina (old town) since we didn’t want to drive frequently or walk too far.  Our riad was called Riad Khalid (name of the owner), and it offered a pack n play and high chair for our daughter, which was PERFECT.  There was a fountain in the courtyard and stone steps going up 4 stories so we did have to watch our VERY mobile toddler closely.  Also, just a tip, if you rent out an entire Riad, I’d highly recommend bringing house slippers.  Riads somehow stay COLD even when the outside temperature is hot.

    20190217_121653.jpg

    Esme enjoying one of our two rooftop patios in our Riad

  2. Language: Morocco’s official spoken language is Moroccan Arabic, although many people also speak French.  In the more touristy areas, English and Spanish are also quite common so getting around was fairly easy.
  3. Food: Food influences most of our travel choices so this is probably my biggest section for this trip.  Marrakesh has delicious, flavorful food filled with spices (but not spicy), and we found that our toddler actually LOVED eating from our plates.  A few restaurants even had children’s menus, although high chairs were a little hard to come by.  If you have a picky eater, lots of bread, french fries, and fruit smoothies are available too!

    20190217_183628

    Dining at Nomad in the Medina

  • Tajines: extremely moist vegetables or meats that are slow cooked with steam in a Tajine pot.  My favorite was chicken lemon tajine, and my daughter yummed this up too!  PERFECT for babes with few teeth since everything was extremely tender and mushy.
  • Couscous: Small steamed balls of crushed durum wheat semolina with stew scooped on top.  Our daughter had vegetable couscous frequently, as a way to get some veggies into her little body.
  • Briouats: sweet or savory puff pastry.  My favorite was filled with meat, cheese, lemon, and pepper
  • Msemmen: Moroccan crepes/ our favorite breakfast treat

20190219_094520

Msemmen (Moroccan crepes)

*Food allergies: Our daughter is allergic to dairy and a few other ingredients, so we did pack some emergency food for her (and it came in handy- milk is hidden in many dishes).  Although there are tiny food stands throughout the medina, there is also a Carrefour supermarket near the medina that had dairy free milk, baby foods, etc for sale.

Kid Friendly Restaurant Recommendations: Nomad (Medina): more expensive than most places but offered a children’s menu and high chair// Le Jardin (Medina) 32, Sidi Abdelaziz, Souk El Jeld// Café des Epices (Rahba Qedima Square): owned by the same developer as Nomad & Le Jardin // La famille (Medina): vegetarian food// Un Dejeuner a Marrakech (Riad Zitioin Jdid, Medina) // Café Clock (Derb Chatouka, Kasbah): This is more of a cultural center than a restaurant, featuring concerts, storytellers, and more, but our daughter LOVED jamming to the live music on the rooftop during dinner.

  1. Getting Around: There are no carseat rules in Morocco, but we always choose to abide by U.S. child passenger safety laws when traveling.  Our AirBnB offered transport from the airport to the Riad so we needed to pack our carseat for that journey.  We chose to stay in a walkable area to minimize how much carseat lugging we would have to do.  For more distant sight-seeing, we chose to take a horse drawn carriage (agree on a price before using one) to many of the further sites, but bus travel was also a good option.

For walking around, we chose to use our baby carrier primarily since we spent a large amount of time in the souks.  Motorbikes, donkeys with carts, and bicycles fly through the souks so being aware of your surroundings was key.  Many Moroccan families were pushing strollers and baby wearing, and most of Marrakech (outside of the souks) was extremely stroller friendly.

20190218_191133

Babywearing everywhere!

  1. Things to Do: This is my no means a comprehensive list, but this was our “to do” list (I literally copied/ pasted this from my Google doc that I made for our trip).
  • Nice weather?
    • Jardin Majorelle (gardens that belong to Yves Saint Laurent): go first thing in the morning and have lunch there too
    • Le Jardin Secret
    • Caleche Ride (Horse drawn carriage) to Menara Gardens or the Majorelle Garden
    • Camel Ride in the Menara Gardens or the Palmeraie
    • Let kids run around Cyber Park
    • Stroll the Djemaa el Fna (Jamaa el Fna) Square: quiet in the day, lively at night (old town square)
    • Pool & Lunch at Beldi Country Club
  • Major Tourist Sites
    • Medersa Ben Youssef: once the largest Koranic school
    • Bahia Palace (Rue de la Bahia): a gift from the grand vizier to his favorite of his 80 concubines
    • Tumbas Saadies (mausoleum)
    • El Badii Palace
    • Souks are north of Djemaa El Fna* (Shopping)
    • Rahba Qedima Square Apothecaries
    • Museum de Marrakech
    • Koutoubia (12th century mosque): cannot enter it unless you are Muslim
  • Henna Tattoo (discuss price beforehand)
  • Rahba Qedima Square Apothecaries

*Again, this is NOT a comprehensive list… just the list that I put together for our trip.  As a side note, we could not find any children’s playgrounds within the Medina so parks and gardens were the only places that our daughter could *somewhat* left off some steam.

20190219_103611

We LOVED Majorelle Garden!

***HELPFUL TIPS***

  1. CELLPHONE DATA: When we first arrived to the airport, we purchased a SIM card from the company Orange (10 Euros for 10 GB) right next to the baggage area.  There are several of these companies.  Since we didn’t use a tour guide, we required data to get around and to find our way home each night.
  2. HELPFUL APPS: We used Google trips and TripAdvisor as our impromptu travel guides.  Loved the walking tours they directed us on AND the downloadable city maps!
  3. RELAXED PARENTS: Traveling with kids can be more exhausting than relaxing.  Since we didn’t stay at a resort in Marrakech (and traveled during one of their colder weeks in the winter), we couldn’t enjoy some of the relaxing outdoor activities.  We chose to take turns during nap time to treat ourselves to a spa experience at a nearby Hamman.  There are also local hammans that are family friendly and much cheaper.  If you stay in the Medina like us but want a more restful day, the Beldi Country Club had a deal that if you ate lunch there, you could enjoy their pools (HEATED) for free.  If relaxing means a bottle of wine, please know that alcohol is not widely available so definitely ask your Riad owner about it in advance.  A hotel/ resort will obviously be a different experience.
  4. RUG SHOPPING: Before arriving I researched the types of Moroccan rugs, as well as how to haggle (I’m terrible at it despite everyone’s best tips) and tips for buying a rug (This entire blog is incredibly helpful in planning a trip to Morocco.).  I purchased three rugs from “Vintage Carpets” (29 Zaouiat Lahdar Kaat, Benahid 40030 Marrakech), which is a red door without any signage, and is the wholesale warehouse for the more upscale shop Les Nomades around the corner.  They will ship your rugs for you or wrap them in a manner that makes them easy to pack for your return flight.  They were also willing to go the cheapest, compared to other shops.
  5. BRINGING BACK FINDS: Many people use the Moroccan Post Office to ship back their finds, or they pack everything in a large container and pay for an oversized bag to bring it back on the plane.  We packed all of our clothing in our carry-ons and brought 2 empty bags with us (one hard-shelled suitcase and a huge empty duffel bag inside it).  We were able to fit 3 rugs, an ottoman, a pillow, and 2 rattan animal heads inside those bags for our return flight so we ended up not having to pay extra for luggage.

20190219_104612

We loved Morocco!

Hope this helps others out that are heading to Morocco with little ones!  I hope to hear all about your travels!


Comparison of Best Travel Strollers

I don’t normally blog about my travels or about baby gear, but I’ve had the toughest time finding a comprehensive comparison of travel strollers for my daughter.  The closest I’ve found is this video by Magic Beans and this guide by Where’s Sharon.  However, I felt they were missing some major contenders in the travel stroller department.  We consider ourselves minimalists so we’d like one stroller that can be used daily as well as for travel, is long lasting, and versatile.  Every family has different needs for their strollers so if your needs align with mine, you might find this comparison helpful.

MY NEEDS: We live in a large city and travel once or twice per month so I am looking for a compact stroller that is easy to store in our home and can be stowed in the overhead bin of an airplane.  Our current City Mini was a GREAT stroller when we lived in downtown Washington DC, but it’s too large to enter our building elevator in our current home.  I need a LARGE basket for groceries, flexibility to use it with a newborn (safely) or toddler, one hand easy fold, and narrow enough to fit in our building elevator (less than 20″ wide).  I would LIKE it to have accessories available, like a child food tray, drink holder, and buggy board to turn it into a stroller for 2.  I’d also like for it to include an adjustable footrest to make it more comfortable for on-the-go naps.  I’m only including strollers that recline.  Therefore, popular mini strollers, like the GB Pockit and Besrey Airplane Stroller, have been excluded.  

ZOE XLC ($249.99, Frequent Sales: $99.99-$149.99)

Starting with the least expensive stroller, by far, the ZOE XLC cannot be used with car seats and has no newborn kit available.  This stroller is only 17″ wide though and can fit in the overhead compartment of most airlines.  It comes with harness comfort pads and a coordinating 4-panel canopy.  You can separately purchase the parent console, travel backpack & storage bag, a single or double carry strap, rain and snow weather covers, deluxe comfort pads/ pillows, additional canopies, and a child console is coming soon.  Although its fold appears simple, it does require two hands.

*This company also makes a ZOE XL1 that has fabulous additional accessories and features, although it does not have my desired adjustable foot rest nor a compact close that can fit in the overhead of an airplane.

Screen Shot 2019-01-12 at 9.42.02 AM.png


Mountain Buggy Nano ($249.99, although I’ve seen it for $199.99 on sale)

The Mountain Buggy Nano would possibly be my favorite if it were narrow enough to fit in my building’s elevator (it’s 22″ wide).  With an easy recline, adjustable footrest, ability to add most carseats without purchasing a separate adaptor, and the numerous optional accessories, it is a standout for its price point.  It comes with the frame, seat fabric, sun canopy with flick out mesh visor, a built-in shoulder carry strap, and a custom fit satchel for travel convenience.  Additionally, you can purchase the newborn cocoon (bassinet), all weather covers, grab bar and food tray, a free rider stroller board (for older siblings), and parent console bag.  It does require two hands to fold it.

Screen Shot 2019-01-12 at 10.01.25 AM.png


GB QBit+ (Starting at $250)

The GB QBit+ is from the same German company that developed the tiny Pockit stroller.  It is small enough to be stowed in the overhead of many airplanes. It features a one-hand close and comes with the belly bar.  Additionally, you can purchase car seat adapters (for Cybex or GB seats), bassinet (“cot to go”), footmuff, parasol, and drink holder.

Screen Shot 2019-01-12 at 7.32.08 PM.png


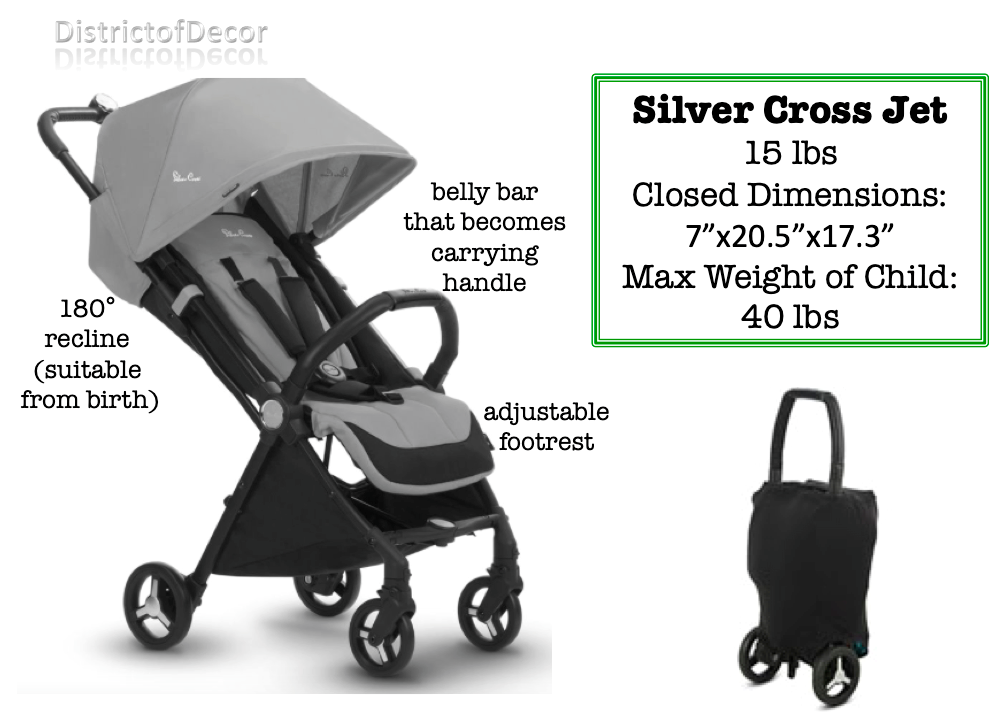
Silver Cross Jet ($349)

This stroller claims to fit in the overhead bin of all airplanes.  I’m uncertain of its actual dimensions since the website lists them differently three times.  It can recline fully flat and has an adjustable footrest.  It requires both hands to fold and has a smaller basket, but the belly bar ingeniously turns into the handle to pull it through airports.  A car seat adapter can be purchased separately for use with Maxi-Cosi, Nuna, and Cybex car seats.

Screen Shot 2019-01-12 at 1.41.00 PM.png


UPPAbaby MINU ($399.99)

The UPPAbaby MINU is a little too wide for my needs, but it’s a new travel stroller option that really impressed me.  It won’t fit in the overhead compartment of most airlines, but its large storage basket and additional storage pocket makes it a standout for everyday use.  It comes with a built-in carry handle and shoulder strap, as well as a storage bag.  Additionally, you can purchase a bassinet kit, car seat adapters (for MESA, Maxi-Cosi, Nuna, and Cyber only), weather shields, and parent console and cup holders.  The impressive one hand fold of this stroller is worth checking out on YouTube.

Screen Shot 2019-01-12 at 10.24.42 AM.png


BabyZen Yoyo ($499+)

The BabyZen Yoyo is incredibly popular with many globetrotters, and I can absolutely see why.  It boasts one handed folding, unfolding, and steering, as well as the ability to fit in most airline’s overhead bins.  It includes a shoulder carrying strap, a storage pouch, and rain cover. The accessories are on the pricier side so it has the potential to cost quite a bit.  You can purchase a rolling bag that attaches to the stroller without tipping it backwards, a board for older siblings to ride along, a coordinating click-in car seat, travel bag, cup holders, parasols, mosquito nets, car seat adapters (for a few select car seats), and a foot muff.  It does not have an adjustable foot rest, although at the end of this blog there’s a resource that shares hacks for many travel strollers, including adding an adjustable foot rest to this one.
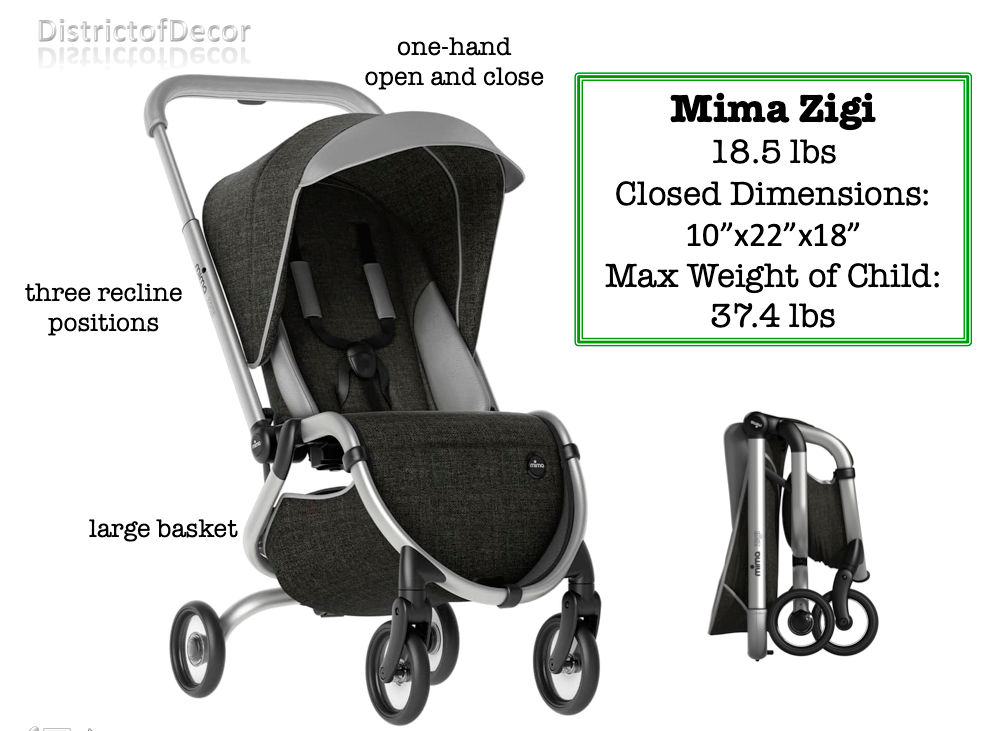
Screen Shot 2019-01-12 at 10.50.51 AM.png

Mima Ziga ($599)

The Mima Ziga is a luxury travel stroller that boasts great reviews for its suspension and gentle ride.  It also has a large basket and high end fabric, along with the following option accessories: bassinet, car seat adapters (for Maxi Cosi, Nuna, Cybex, and UPPAbaby seats), footmuff, cup holder, belly bar, weather cover, and mosquito net.  The one hand close and open is one of the smoothest in the group, but I’m surprised it is lacking an adjustable footrest at this price point.  It can fit in the overhead bin of many airplanes, although it’s a bit heavier than other options.

Screen Shot 2019-01-12 at 8.56.26 PM.png


Cybex Mios (Starting at $649.95)

The Cybex Mios is a luxury travel stroller with the price to match.  It’s much larger than the other stroller previously featured and would not fit in the overhead compartment of an airplane.  It does, however, have many features that only come in much larger strollers, such as the reversible seat unit.  It has a one-hand close, as well as a large storage basket.  It comes with the Mios colour pack and comfort inlay, car seat adaptors, cup holder and raincover.  For an additional cost, you can purchase a bassinet to use it from birth, snack tray, parasol, mosquito net, and foot muffs.

Screen Shot 2019-01-12 at 2.17.11 PM.png

On Amazon, I’ve discovered that many companies sell equipment to “hack” many of these travel strollers, providing additional features outside of the manufacturer.  Mommy Simply is a website that shares numerous hacks and products to improve the function of your stroller, although there could be repercussions from using non-manufacturer approved add-ons.  
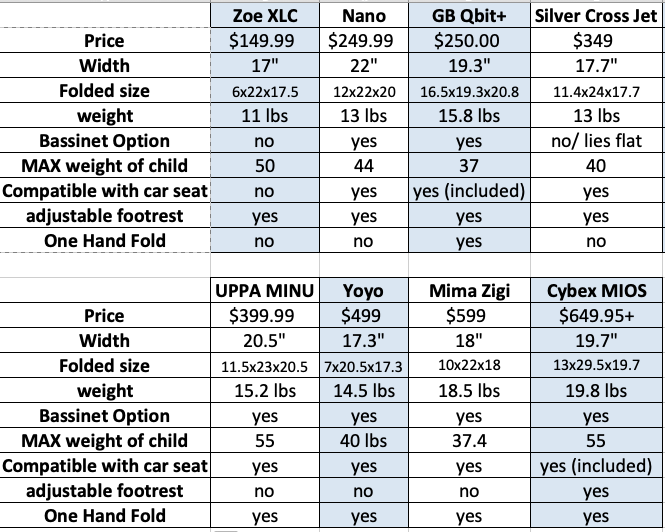
COMPARISON CHART

Screen Shot 2019-01-12 at 9.12.35 PM.png

*Honorable mentions*

Diono Traverze ($249.99): Compact, reclinable stroller that has a hidden luggage handle to pull through the airport.  Many reviews complained about a shallow seat and difficulty stearing on rough surfaces.

Screen Shot 2019-01-12 at 2.53.41 PM.png

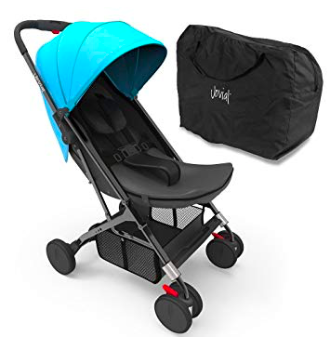
Jovial Portable Foldable Stroller ($117): This compact stroller folds down to a tiny 10.6″ x 22″ x 18.9″ and weighs only 16 lbs.  The reviews describe the quality as poor, and it only holds up to a 35 lbs toddler.  That being said the price is great for such a compact, feature loaded stroller.

Screen Shot 2019-01-12 at 3.17.31 PM.png

Kolcraft Cloud Plus ($68):  I’m going to call this stroller the grocery stroller.  If I had space for a stroller JUST for grocery shopping, I’d buy this one up.  For the price, features (gloriously large basket, parent tray, AND child tray), and a one-hand close, this little stroller is impressive.  Looking at the wheels, I can tell that it wouldn’t hold up well on the cobblestone streets of Italy (where I live), and it folds a bit larger than I’d prefer (12″x18″x34″).  There are complaints about the wheels, opening/closing mechanism, and short lifespan of the stroller.

Screen Shot 2019-01-12 at 3.27.30 PM.png

Baby Jogger City Tour ($200): I’ve actually used this little 14 lb stroller that can hold up to a 45 lb child.  It drives well, which is expected of a Baby Jogger product, but the seat was far too shallow for my liking.  That being said, it’s a well made travel stroller, featuring plenty of additional accessories.

screen shot 2019-01-12 at 9.03.49 pm

I’d love to hear from anyone that has any of these strollers and has an opinion on them.  I’m still deciding on which I prefer since no stroller seems to have everything that I want.  I’d also love to hear if you recommend a stroller that’s not on this list.  Hopefully, this compilation helps someone else deciding.

screen shot 2019-01-12 at 9.20.28 pm

The Look for Less: Animal Rugs

I’ve been teaching Esme all of the animals and their sounds, and I think it’s carried over into my design taste.  😛  All of a sudden, I’m obsessed with bizarre, cheeky faux animal hides.  I actually need a rug for our third bedroom and found this adorable option at Anthropologie.  I love how it has a layered look, and I would have never thought to put a funky faux hide over a striped rug.  OBSESSED… but that price tag…

anthrotiger.jpg

Martine Rug from Anthropologie ($598)

I went on a search for the best cheeky “faux fur hides” that I could find at a reasonable price, and I had to share my findings.  These would look adorable in a kids’ bedroom, playroom, bathroom, etc.  Really, they’re not just for kids, but that’s where my brain is lately.

anthrozebra

Hand Embroidered Safari Rug by Anthropologie ($186)

How cute would these be in front of a sink in the bathroom or layered on a jute or striped rug in a large room?! On an unrelated note, I’ve had to google the sounds that most non-farm animals make recently… like the zebra.  My daughter points to her plastic animals and wants to hear their sounds, and I never thought I’d be googling youtube videos of giraffe and zebra noises.  😛


These tiger-shaped rugs are from Urban Outfitters and are only $49!  These are tiny enough that they might even look cute draped on the back of a couch or chair.


These tiger rugs ($49) are actually bath mats from Urban Outfitters, but I feel like they would be adorable in a toy room too.  They’re also an absolute STEAL compared to the zebra bathmats ($88) by Jonathan Adler (below).

style_Zebra_BathMats.jpg

I think I’m leaning towards one of the cheaper Urban Outfitters rugs layered on top of an inexpensive, washable rug like this one, which comes in several funky, restrained colors.   I made a few combinations with that rug and the ones above, and now I just have to figure out which combo I like best.

screen shot 2019-01-10 at 2.09.38 pmscreen shot 2019-01-10 at 2.09.44 pmscreen shot 2019-01-10 at 2.09.53 pmscreen shot 2019-01-10 at 2.10.00 pm

Which do you like best?

Creating a Mindful and Respectful Play Area

I’m not a parenting expert.  I have one child and am figuring out how to raise her without messing her up too badly.  My only prior experience is babysitting in high school (which I did a crap job of), working in an infant care facility (but I mainly just snuggled, fed, and changed them), and a decade as a public school teacher (with a few degrees that go along with that).  I considered what some of my best students had in common:   empathetic, creative, and responsible.  I’m certain that all of these children had very different upbringings, but I researched different parenting methods that could help me develop those traits in my daughter and discovered a few of my favorite parenting/ education styles: Montessori, Waldorf, and RIE.  If you’re interested in reading a brief overview of the styles, this is a great place to begin.

This all relates to this post because we decided to give our daughter a play space for Christmas.  Trying to make intentional parenting choices, I researched numerous play spaces and decided I wanted a play space that was both mindful and respectful of my daughter’s needs, development, interests, etc.  I’m going to warn that I got a little hyperlink happy in this post.  Since we’re still in the planning stages, I wanted to remember key information so I linked A LOT of ideas and products.

Before creating the play area, I wrote down a list of goals that I had for the space.

  1. Minimalistic: I want a toy shelf with space for 1-2 toys/ manipulatives on each shelf and perhaps a few spots for boxes to hold blocks or balls.  *We have more toys than will fit on the shelf, but I plan to alternate them to keep my daughter from getting overwhelmed by choice or clutter.  Additionally, I like this approach as it will help me to easily see which toys spark my daughter’s curiosity or interests more.

toystorage.jpg

2. Orderly: According to the Montessori philosophy, children have a “sensitive period” when they are attracted to and able to learn about something.  From birth until about age 5 is a child’s sensitive period for order, but it peaks in early toddlerhood.  Young children love routine and repetition, and I’d like my play space to support this sensitive period by giving a specific, predictable spot for everything.

Orderly.jpg

Orderly Toy Storage

3.  Thoughtful Toy and Activity Selection:  I want to be sure to include toys that develop fine motor AND gross motor skills, art and music interests, books, and open-ended items for creative play. *I only recently started researching active vs passive toys, and the argument for passive toys is so interesting to me.  I had never even considered the concept before!

MontessoriToys_MotherMag.jpg

Open-Ended Toys

4. Safe, Open Space:  In the RIE philosophy, children require a “YES” space where they are free to play without constantly being interrupted (often for safety concerns).  It is best to keep the space relatively small (one child-proofed room or a section of one room) to help the child maintain focus and foster independent play.  That being said, we also believe in allowing our daughter to discover her own boundaries and abilities.  We own a Pikler Triangle that will be brought into the “YES space” when we are able to observe our daughter playing (since it can be “dangerous”).  It is just one way to give our daughter an opportunity to learn how her body can move and climb all on her own!

pikler.jpg

Lily & River Pikler Triangle with Slide Attachment

5. Include Nature: Nature is a large part of the Waldorf philosophy, as it reveals our kinship with all living things and teaches them about the rhythm of life.  We chose a play space with large, low windows so our daughter has the freedom to observe the outdoors and natural changes of the world.  Her play space is also accessible for our two cats so she is able to interact and observe them.  We would like to include a few small edible herb plants that she can help care for, as well, but that won’t be harmful to the cats that share the space.

autumncorner.jpg

6. Respectful of Parents’ and Child’s Needs: According to the Montessori philosophy, the job of a child is to play.  The job of the parent is… well, we have to do a million things everyday.  I like to observe my daughter as she plays, but I also need to prep our meals, pay bills online, clean the house, write blog posts (okay, that’s just for fun), etc.  For this reason, we decided to put the play space (and all toy storage) in our living room, where we have already child-proofed everything, we can watch our daughter carefully, relax as a family, and close it off to the rest of the house easily.

Screen Shot 2018-11-20 at 2.35.05 PM.png

Our Current Living Room Set-Up

I’m so excited to start getting everything prepared for this project!  We’re still deciding if we want to have it ready for Esme on the evening of Christmas Eve so she wakes up to the new space of if we’ll set it up earlier and do a small stocking for her instead.  I’ll update though!